
You need a good way to design photovoltaic mounting systems for rooftops, ground sites, and pole mounts. You must follow safety rules and use strong materials. Many code problems happen with the National Electrical Code (NEC), International Building Code (IBC), and local building permits. The table below shows important standards you should know:
| Code/Standard | Description |
|---|---|
| National Electrical Code (NEC) | Safety rules for electrical setups, including solar PV systems. |
| International Building Code (IBC) | Building rules that affect how solar PV systems are built. |
| Local Building Permits | Sets special rules for solar setups, like setbacks and height limits. |
You should also check DC module wiring color codes to keep things safe and working right.
Key Takeaways
Always check how strong your roof or ground is before you install photovoltaic systems. This stops damage from heavy panels or strong winds.
Pick tough materials like stainless steel or alloys that do not rust. These materials help your mounting systems last longer and work better.
Follow local building rules and safety standards. Doing this keeps your system safe and follows the law.
Look at your photovoltaic systems often, especially after storms. This keeps your system safe and working well for a long time.
Pick the best mounting system for your site. Think about space, sunlight, and local weather when you choose.
1. Key Principles for Photovoltaic Mounting Systems
Load and Structural Analysis
You need to make sure your roof or ground is strong enough. This is important before you put on photovoltaic mounting systems. If you skip this, heavy panels or strong winds can cause damage. Here are the main things you should check:
Figure out how much wind, snow, and weight the system will have.
Use computer programs like AutoDesk Robot Structural Analysis for better answers.
Make sure the roof and anchors can hold up against wind from below and the side.
| Material Type | Lifespan Increase | Benefits |
|---|---|---|
| Advanced Composites | Over 30% | These last longer and work better. |
| Corrosion-Resistant Alloys | Over 30% | These stay strong and work well for years. |
Orientation and Tilt
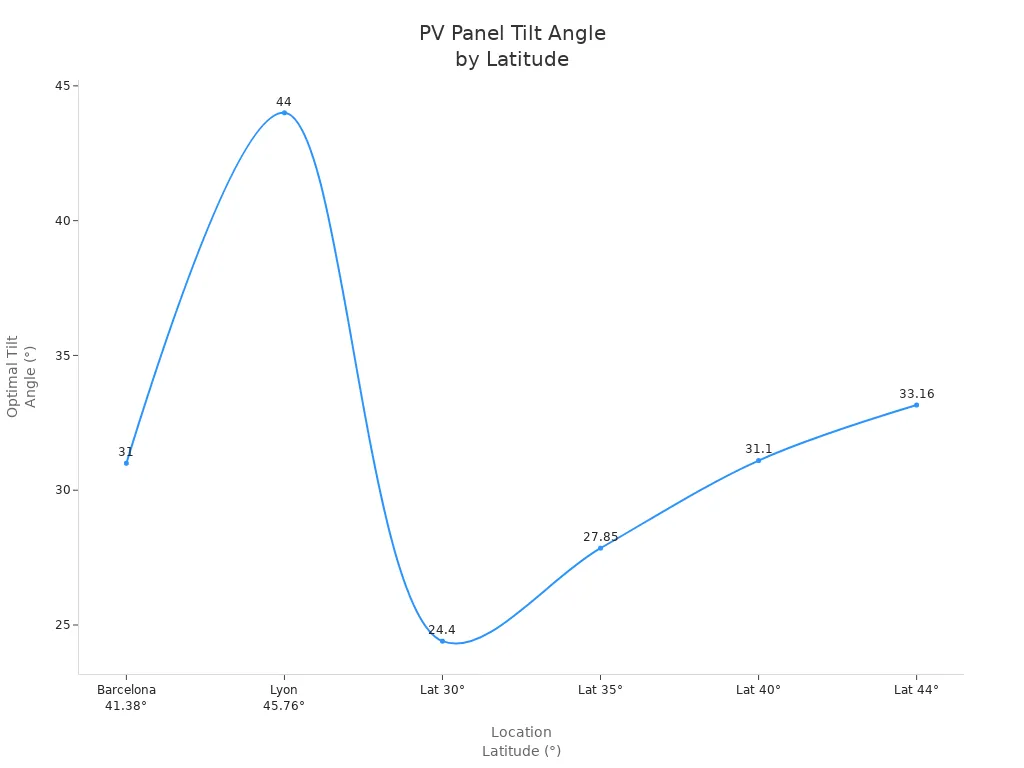
You need to set your solar panels at the right angle. This helps them get the most sunlight. The best angle depends on where you live. For example, in Barcelona, the best tilt is about 31°. In Lyon, it is about 44°. You can use easy math with your latitude to find the best angle.
Material Selection
Pick materials that last a long time and can handle bad weather. Here are some common choices:
Stainless steel is very strong and does not rust easily.
Galvanized steel has a zinc layer and is a good deal.
Aluminum is light and simple to put in place.
Plastics are good for small parts that need to stay dry.
Safety and Code Compliance
You must follow safety codes to keep your system and home safe. Here are some important rules:
| Standard/Code | Description |
|---|---|
| National Electrical Code (NEC) | Tells you how to ground PV systems safely. |
| International Building Code (IBC) | Used by most states to keep buildings safe. |
| UL 2703 | Explains how to ground equipment to stop shocks or fires. |
Durability and Performance
Bad weather can hurt photovoltaic mounting systems. Hail, hurricanes, and heavy snow can break things and stop power. Strong winds might move panels or break the mounts. You should use tough materials and smart designs for your area’s weather. Fixed mounting systems work in most places. Tracking systems can make more energy when the weather changes.
Tip: Always look at your system after storms to make sure it is safe and working well.
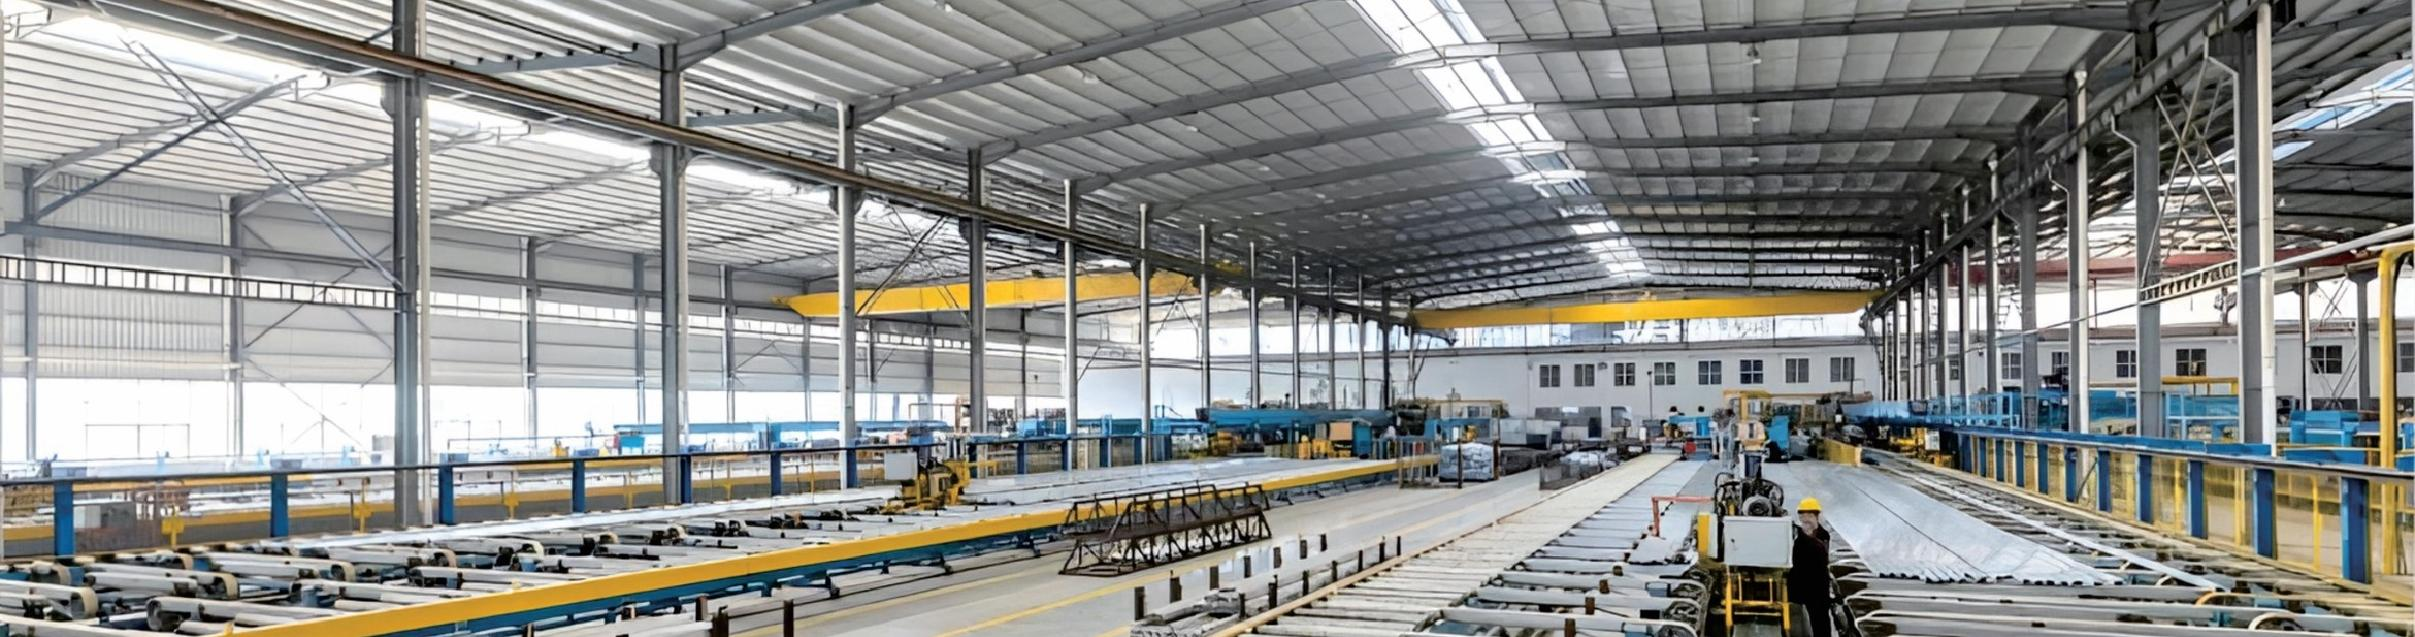
2. Rooftop Photovoltaic Mounting Systems
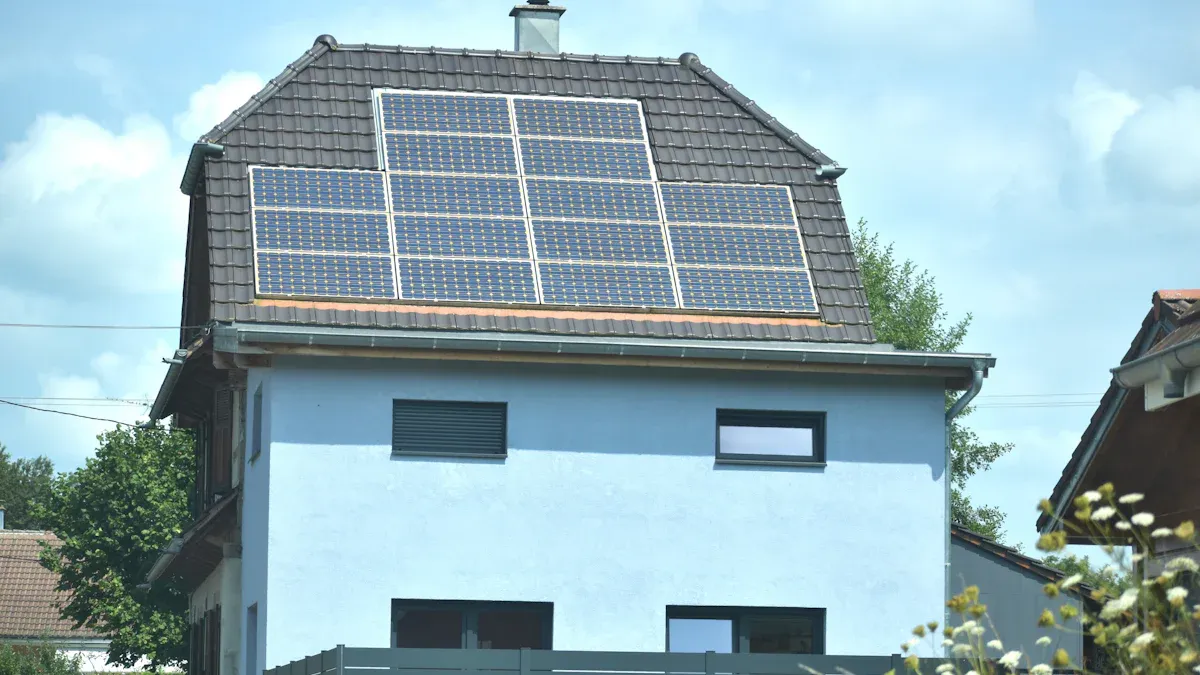
Roof Assessment and Condition
You should always check your roof before installing photovoltaic mounting systems. Look for signs of leaks, weak spots, or old materials. If your roof is in poor shape, fix it first. You need to know what type of roof you have. Asphalt shingles, tile, metal, and flat roofs all need different approaches. Talk to your roofing manufacturer to make sure your installation will not void your roof warranty.
Structural and Load Requirements
You must make sure your roof can hold the weight of the system. Here is what you should do:
Check the roof’s structure and strength before you start.
Add up the weight of the panels, mounting hardware, and any snow or wind loads.
Make sure rafters or trusses can support the extra weight without damage.
If you have a flat roof, you may need a special permit. Flat roofs often use ballasted systems that do not require drilling. Always check if your roof can handle the extra weight.
Setbacks and Fire Code Compliance
You need to follow fire codes and local rules. Most places require a 3-foot setback from the edge of a flat roof. This space helps firefighters move around the panels safely. Some areas have special rules for panel spacing and pathways. Always check with your local building department before you begin.
Tip: Following setbacks and fire codes keeps your home safe and helps you pass inspections.
Mounting Hardware Selection
Choose the right hardware for your roof type. The table below shows common options:
| Roof Type | Recommended Mounting System(s) | Key Considerations |
|---|---|---|
| Asphalt Shingle | Roof Mounting System | Seal around holes to stop leaks. |
| Tile (Clay/Concrete) | Tile Roof Solar Mounting System | Handle tiles carefully to avoid breaking them. |
| Metal (Standing Seam) | Metal Roof Solar Mounting System | Use clamps to avoid drilling. |
| Flat (Membrane) | Flat Roof Solar Mounting System | Use ballasts and check for wind uplift. |
You should use special hardware for wood shake or slate roofs. Always ask a professional for help with these roofs.
Installation and Weatherproofing
You must protect your roof from leaks and damage. Here are some best practices:
Use corrosion-resistant sealant on all metal parts.
Pick the right screws for your roof material.
Do not block water flow on the roof.
Use mounts with raised stanchions for better drainage.
Have a professional check your system after installation.
Good weatherproofing keeps your photovoltaic mounting systems working well for many years.
3. Ground-Mounted Systems
Site Selection and Preparation
Pick a spot for your ground-mounted solar panels. Find flat land with no shade from trees or buildings. The best places have strong sunlight and are easy to reach. Check the soil and make sure water drains well. Use a checklist to compare different spots:
| Criterion | Weight |
|---|---|
| Environmental sustainability | 0.218 |
| Initial investment | 0.196 |
| Operating expenses | 0.163 |
| Technical feasibility | 0.154 |
| Social acceptability | 0.140 |
| Scalability | 0.129 |
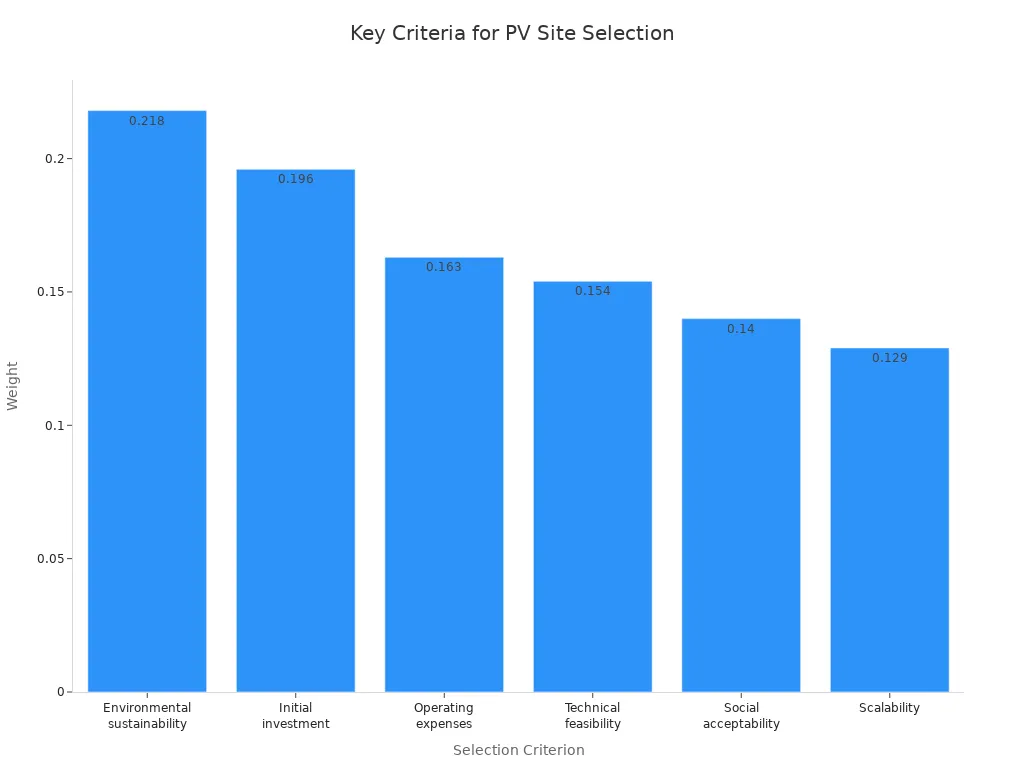
Specific photovoltaic power output is important when picking a site. Experts use the AHP method to check if a spot is good based on climate and utility data.
Foundation and Support
Choose the right foundation for your soil. Here are some common options:
Concrete piers are good for permanent setups.
Driven piles are steel posts hammered deep for strength.
Ground screws twist into sandy soil and are quick to install.
Ballasted systems use heavy blocks and do not need digging.
Earth anchors are fast for temporary projects.
Ground screws work well in sandy soils. Clay soils need deeper foundations. Rocky ground is best for ballasted systems or pre-drilled ground screws. If you want a reliable setup, try the Ground Solar Mounting System.
Array Layout and Spacing
Space your panels so they do not block each other. If panels are too close, the front row can shade the back row. Good spacing gives each panel enough sunlight and keeps them cool. Higher ground clearance helps panels get more sun and makes maintenance easier. It also lets you mow grass or clear weeds without trouble. Proper spacing stops damage and makes cleaning simple.
Installation Steps
Follow these steps to install your system safely:
Prepare the site and mark where foundations go. Check for buried wires.
Install foundations based on the soil type.
Put together the racking with galvanized hardware.
Mount the panels and connect the wiring.
Test the system to make sure it works and meets safety codes.
You need permits for both structural and electrical work. Follow NEC and UL 2703 standards. Inspect your system at each step.
Security and Maintenance
Keep your system safe from theft and damage. Use video cameras with smart features. Set up remote monitoring for real-time alerts. Add alarm systems and signs to scare off thieves. Build barriers like bollards or thorny bushes. Install motion sensors and high-resolution cameras. Check your system every year. Keep the area clear of weeds and water. Manage plants for fire safety and easy access.
| Security Measure | Description |
|---|---|
| Access Control Systems | Use biometric scanners and key cards to monitor entry. |
| Physical Barriers | Set up vehicle barriers and thorny plants to block access. |
| Perimeter Intrusion Detection Systems | Use motion sensors and CCTV for early warnings. |
| Surveillance Systems | Install night vision cameras for continuous monitoring. |
| Alarm Integration | Connect alarms to alert security staff and police. |
| Security Protocol Development | Make clear response plans and review them often. |
Tip: Yearly inspections and smart security keep your photovoltaic mounting systems safe and working well.
4. Pole Mount Photovoltaic Systems
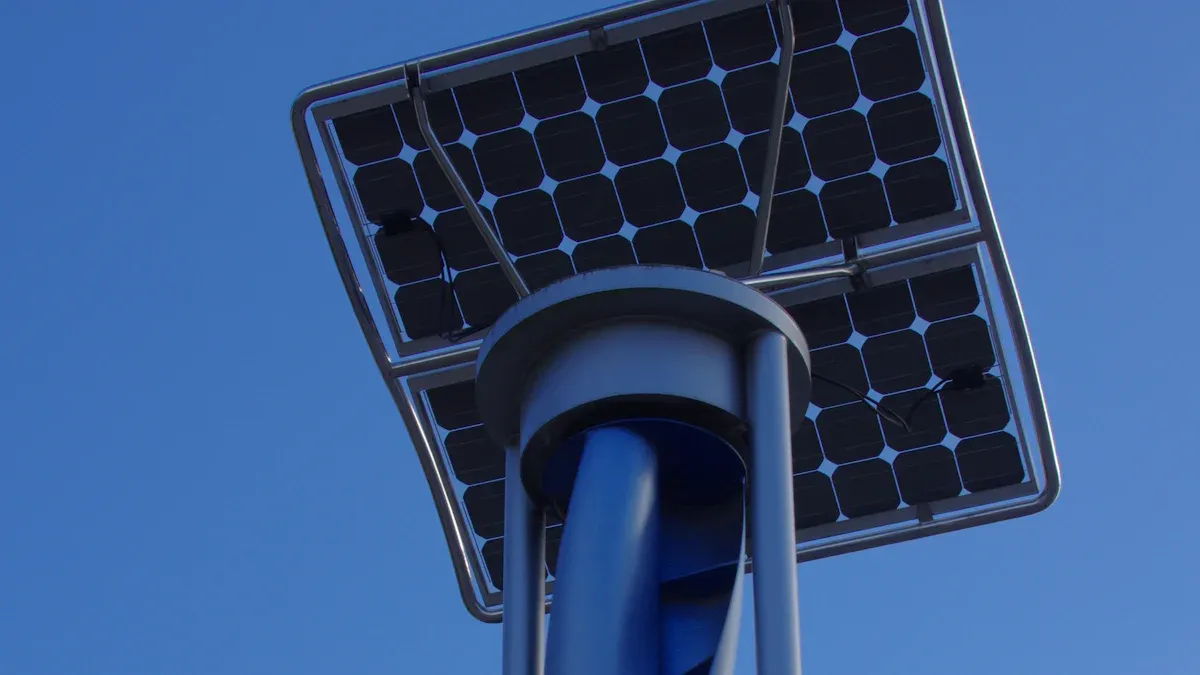
Pole Type and Location
There are different pole types for your solar array. The table below lists the main choices and their best uses:
| Type of Pole Mount | Description | Suitable For |
|---|---|---|
| Standard Pole Mounts | These use one or more poles for many array sizes. | Good for small or medium arrays |
| Top-of-Pole Mounts | Panels go on top to stop shade and save space. | Great for places with little space |
| Adjustable Pole Mounts | You can change the tilt for more sunlight in each season. | Best for places needing tilt changes |
Pick a spot with lots of sun and little shade. Higher poles help panels stay clean and let snow slide off.
Foundation and Anchoring
Your pole mount needs a strong base. In windy or earthquake areas, follow these tips:
Use systems that attach tightly for best safety.
Make sure anchors keep the pole steady in strong winds or shakes.
Use both heavy weights and tight attachments for extra strength.
A strong base keeps your system safe and working well.
Array Attachment and Tilt
You can change the tilt of your panels to get more energy. Moving the tilt for each season gives 10–25% more power than fixed panels. For summer, set the tilt to your latitude minus 15°. For spring and fall, use your latitude. For winter, use latitude plus 15°. This helps you use more solar power and less grid power.
Tip: Adjustable pole mounts make it easy to change the angle for more energy.
Tracking Systems and Efficiency
Tracking systems move with the sun all day. This gives 22–23% more energy than panels that do not move. In the morning, you get 29–33% more power. In the evening, you get over twice as much energy. At midday, you get 4% more. Tracking panels make 0.224 kW-h each day. Stationary panels make 0.182 kW-h.
Note: Tracking systems cost more but give better performance and more energy.
Maintenance and Accessibility
Check your system at least two times each year. Look for damage and make sure frames are tight. Clean the panels to get rid of dirt and leaves. Check batteries and wires to keep things safe. Make sure poles and mounts are steady and not rusty. Watch how your system works and change settings if needed.
Clean panels to keep them working well.
Check batteries and change them if needed.
Look at lights and make sure they are lined up.
Take care of poles and mounts so they stay strong.
Doing regular checks helps your photovoltaic mounting systems last longer and work better.
5. Comparison Table: Rooftop, Ground, and Pole Mounts
You can use this section to compare the main features of rooftop, ground, and pole mount photovoltaic mounting systems. This quick reference will help you choose the best option for your site and needs.
| Feature | Rooftop Mounts | Ground Mounts | Pole Mounts |
|---|---|---|---|
| Structural Needs | Uses existing roof structure. Must check roof strength and age. | Needs strong foundation for panels and racking. Handles wind, snow, and seismic loads. | Requires deep foundation (3-4 feet). Depth changes with soil and frost line. |
| Installation Complexity | Needs roof access and safety gear. May require special flashing and waterproofing. | Easier access at ground level. Terrain and weather can add difficulty. | Needs careful engineering for stability. Adjustable and tracking systems add complexity. |
| Cost Factors | $0.15–$0.40 per watt. Lower labor and material costs. | $0.50–$1.50 per watt. Higher costs for foundation and site work. | $150–$600 per panel. More expensive due to pole and foundation. |
| Maintenance | Harder to access. Needs safety equipment for cleaning and repairs. | Easy to reach for cleaning and checks. Simple to maintain. | Easy to clean and remove snow. Must check pole stability often. |
| Best Applications | Homes with good roof space and structure. | Sites with open land and higher energy needs. | Small sites, uneven terrain, or where snow shedding is important. |
Structural Needs
Rooftop systems use your building’s structure. You must check if your roof can hold the extra weight.
Ground mounts need a strong base. They handle heavy loads from panels, snow, and wind.
Pole mounts need a deep foundation, usually 3-4 feet. Sandy soil or frost lines may require deeper holes.
Installation Complexity
Rooftop systems need safety gear and careful planning. You must avoid leaks and follow roof codes.
Ground mounts are easier to install but need more site work. Soft or unstable ground makes things harder.
Pole mounts need precise engineering. Adjustable or tracking systems add moving parts and setup steps.
Tip: Always follow safety rules and use the right tools for each system.
Cost Factors
Rooftop mounts cost less to install. You pay $0.15–$0.40 per watt.
Ground mounts cost more, about $0.50–$1.50 per watt. You pay for extra foundation and labor.
Pole mounts cost the most, $150–$600 per panel. The pole and deep foundation add to the price.
Solar panel mounting costs usually make up 8–12% of your total system price.
Maintenance
Rooftop systems are harder to clean and fix. You may need special ladders or harnesses.
Ground mounts are easy to reach. You can clean and check them without climbing.
Pole mounts are simple to clean and remove snow. You must check the pole for rust or movement.
Best Applications
Rooftop systems work best for homes with strong, open roofs.
Ground mounts fit large yards or places with high energy needs.
Pole mounts are good for small spaces, hilly land, or snowy areas.
You can choose the right photovoltaic mounting systems by comparing your site, budget, and energy goals.
When you design photovoltaic mounting systems, you need to think about the environment. Look at things like wind and the land around you. Pick the system that fits your place best, like roof, ground, or pole. Make sure you use trained installers and good equipment. Always follow safety rules and building codes. Check your system often to keep it safe and working well.
If you pick strong materials, your system will last longer. Get a professional to check your system on a schedule. This helps it work better and last more years. For the best help, talk to Angels Solar or another expert you trust.
FAQ
What is the best mounting system for my roof type?
You should match your roof with the right system. For shingles, use a Roof Mounting System. For tile roofs, pick a Tile Roof Solar Mounting System. Metal roofs work best with a Metal Roof Solar Mounting System.
How do I prevent leaks when installing solar panels?
Seal all holes with waterproof materials. Use mounts designed for your roof. For flat roofs, choose a Flat Roof Solar Mounting System that avoids drilling. Always check for proper drainage after installation.
Can I install ground-mounted solar panels myself?
You can install a Ground Solar Mounting System if you follow safety steps. Check soil strength and use the right foundation. For large projects, ask a professional for help.
How often should I inspect my photovoltaic mounting system?
You should inspect your system twice a year. Look for loose bolts, rust, and dirt. Clean panels and check wiring. After storms, check for damage right away.
Do pole mounts work in snowy areas?
Pole mounts help snow slide off panels. You can adjust the tilt for better performance. Choose strong poles and deep foundations for safety in harsh weather.
