
You can install a ground mount for large solar panels by following a few clear steps. Start with the right tools and strong materials like steel beams or galvanized steel. Choose a spot with lots of sunlight and make sure the area is flat. People like ground mounts because you can place them in open fields or even use them for carports. Here’s a quick look at how popular this choice is:
| Metric | Value |
|---|---|
| Projected market value (2025) | USD 121.2B |
| Projected market value (2035) | USD 197.4B |
| CAGR | 5.0% |
Always work safely and take it step by step for great results.
Key Takeaways
Get important tools like a tape measure, level, and power drill before you begin your solar panel project. - Pick a flat, sunny spot for your ground mount so your solar panels make more energy and are easier to put in. - Use tough materials that can handle bad weather, like galvanized steel, to help your solar panels last longer. - Stay safe by wearing protective gear and looking at local building rules before you start. - Check and take care of your solar panel system often so it works well and lasts a long time.
1. Tools and Materials for Ground Mount
You should get all your tools and materials before you begin. Strong and weather-resistant parts help your solar panels last longer. Here is what you need.
Essential Tools
You do not need special tools, just the basics. Here is a simple list:
Tape measure
Level
Shovel or post hole digger
Wrenches and socket set
Power drill with bits
Concrete mixer (for bigger jobs)
Marker or chalk line
These tools help you measure, dig, and put together your ground mount.
Key Materials (Steel, Rails, Pipes)
Picking good materials makes your ground mount strong and safe. Most ground mount solar panel systems use:
12-inch concrete round casting tubes, buried about 36 inches deep for strong support
Schedule 40, 2-inch galvanized pipe for posts
10 ml PVC tape to wrap pipes where they touch concrete (this stops rust)
Galvanized strut for mounting panels
Pipe cross braces and vertical ties for extra strength
Steel reinforced concrete blocks (24"x24"x24") if you hit rock underground
Tip: Always pick weather-resistant materials like high-strength galvanized steel. These can handle strong winds, heavy snow, and earthquakes. Look at this table for more information:
| Feature | Description |
|---|---|
| Material | High-strength galvanized steel, marine-grade aluminum, stainless steel fasteners |
| Weather Resistance | Handles harsh weather and salt air |
| Wind Load Capacity | Stands up to hurricane-force winds over 150 mph |
| Snow Load Considerations | Supports heavy snow without bending |
| Seismic Resistance | Flexible joints for earthquake safety |
| Thermal Expansion | Joints adjust to temperature changes |
| Quality Assurance | Tested for extreme conditions |
A strong ground mount keeps your solar panels safe in bad weather.
Safety Gear
Safety is important. Make sure you have:
Insulated gloves
Safety glasses
Fire-resistant clothing
Wearing the right gear keeps you safe from cuts, shocks, and other accidents.
Now you are ready to start your project. The right tools and materials help you build a strong ground mount.
2. Site Selection and Preparation
Choosing Location
You want your solar panels to soak up as much sunlight as possible. Start by picking a spot that faces south. South-facing slopes get the most sun, while north-facing slopes miss out. Flat land works best because it makes installation easier and helps your panels catch more rays. If you have farmland or a big open area, you’re in luck. These spots are perfect for a Ground Mount. You can even use carports or other open spaces if your roof isn’t right for solar.
Here’s a quick table to help you decide:
| Criteria | Description |
|---|---|
| Land Aspect | South-facing slopes (112.5° to 202.5°) get maximum sunlight. |
| Viewshed Analysis | Use sunlight exposure tools; areas with values of 0-3.6 are good. |
| Geomorphic Landforms | Flat land is ideal. Rugged terrain makes things tough. |
| Land Use/Land Cover (LULC) | Farmlands are open, flat, and easy to access. |
You also need to think about the tilt angle. The right tilt helps your panels make more energy. Check out this chart for the best tilt angles in different regions:
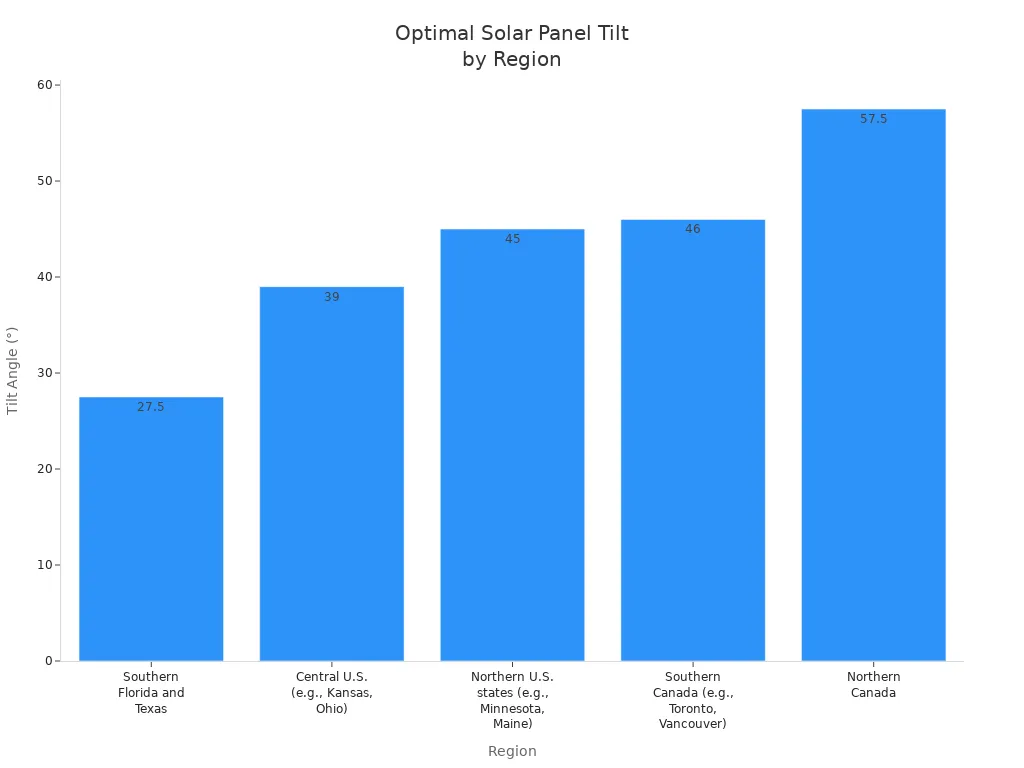
| Region | Optimal Tilt Angle |
|---|---|
| Southern Florida and Texas | 25-30° |
| Central U.S. (e.g., Kansas, Ohio) | 38-40° |
| Northern U.S. states (e.g., Minnesota, Maine) | 43-47° |
| Southern Canada (e.g., Toronto, Vancouver) | 43-49° |
| Northern Canada | 55-60° |
Clearing and Leveling
Once you pick your spot, you need to clear and level the ground. Here’s what you should do:
Check sunlight exposure and soil type.
Remove rocks, sticks, and any debris.
Level the ground so your mounting racks stay stable.
Make sure there are no shadows from trees or buildings.
If you have a big property, you can set up a larger solar array. Ground-mounted panels are easier to clean and maintain, especially in snowy places.
Marking Layout
Now you’re ready to mark where everything goes. Follow these steps:
Use your design layout to mark the spots for racks and panels.
Leave enough space between panels for airflow and easy maintenance.
Tip: Planning your layout helps you avoid mistakes and makes installation smoother.
You’ve finished site prep. Next, you’ll build a strong foundation for your solar panels.
3. Ground Mount Foundation
Making a strong foundation is very important for your solar panel project. This helps your system last a long time and stay safe in bad weather. Let’s look at the steps.
Digging or Setting Posts
First, you dig holes or put in posts for your Ground Mount. How deep you dig depends on the foundation you pick. Look at this table for how deep to go and how to line things up:
| Foundation Type | Recommended Depths | Alignment Techniques |
|---|---|---|
| Concrete Piers | 3-4 feet deep | Needs digging and concrete to dry |
| Driven Piles | 8-10 feet deep | Use big hammers to push them in |
| Ground Screws | Varies (installed in minutes) | Twisted in for strong hold |
| Ballasted Systems | N/A | Heavy blocks keep it steady |
| Earth Anchors | N/A | Fast to set up for short-term use |
You must dig straight holes and keep posts standing tall. Use a level and string to make sure everything is lined up.
Concrete Footings or Ground Screws
Now, choose between concrete footings or ground screws. Both have good points. Here’s a table to help you compare:
| Foundation Type | Advantages | Ideal Conditions |
|---|---|---|
| Concrete Piers | Very strong and lasts a long time, good for permanent setups | Hard soil, windy places, big solar arrays |
| Ground Screws | Quick to put in and works in many places, does not mess up the ground much | Sandy or soft dirt, fast home projects |
Concrete footings are best for big solar panels and places with lots of wind or snow. Ground screws are faster and easier if your dirt is soft.
Tip: If you live where it is windy or snowy, use strong choices like pipes filled with concrete or posts with extra support. Companies like Ironridge and Tamarack make systems that can handle winds up to 170 mph.
Alignment Check
Before you pour concrete or tighten screws, check if everything is straight. You want all posts to be lined up and spaced right. Here is what to do:
Use a level and tape measure for each post.
Run a string between posts to keep them in a straight line.
Check the space between posts for your solar panels.
If you want your mount to be even stronger, put rebar in the middle of the supports and do not use U bolts if it is very windy. Some ground mounts use fewer vertical posts to help with strong winds.
Note: A good foundation keeps your solar panels safe and steady. Go slow and check your work at every step.
4. Ground Mount Structure Assembly

Building your Ground Mount frame is where things start to take shape. You get to see your project come together, and it’s easier than you might think. Here’s how you can do it step by step.
Frame Assembly
Lay Out the Rails and Pipes
Start by placing your rails and pipes on the ground where you marked your layout. Most systems, like IronRidge, use a modular design. This means you can add more panels later if you want.Attach the Vertical Posts
Secure the vertical posts into your foundation. Make sure each post stands straight by using a level.Connect the Horizontal Rails
Fasten the horizontal rails to the posts. These rails hold your solar panels. Adjustable tilt features let you set the best angle for sunlight.Check for Expansion
Leave a little space at the joints. This helps the frame handle temperature changes without bending or breaking.
Tip: Modular frames make it easy to expand your solar ground mount system in the future.
Securing Components
Use galvanized steel bolts and fasteners to connect all parts. The zinc coating helps prevent rust.
If you live near the ocean or in a place with salty air, you might need stainless steel or aluminized parts.
Make sure your foundation goes below the frost line. This keeps your frame steady during cold weather.
Ground screws work well if you want to resist strong winds.
Safety first! Wear gloves and safety glasses. Follow OSHA guidelines and check your work as you go.
Stability Check
You want your solar panel ground mounting systems to last for years. Here’s what to look for:
Inspect all bolts and joints. Tighten anything that feels loose.
Check the frame for level and straightness.
Look for signs of bending or stress, especially after storms or heavy snow.
Schedule regular inspections to catch problems early.
| Load Type | Description |
|---|---|
| Wind Load | Strong winds can push or lift the frame. Some areas see forces over 1,000 N/m². |
| Snow Load | Heavy snow adds weight. Alpine regions may see over 200 kg/m². |
| Thermal Expansion | Temperature changes make metal expand and contract. Joints must allow for this. |
A strong ground mount solar frame stands up to wind, snow, and heat. Take your time and double-check each step for a safe, long-lasting setup.
5. Panel Mounting, Wiring, and Inspection
Attaching Solar Panels
Lift and Place Panels Carefully
Always get help when lifting large panels. Set each panel on the rails and line up the mounting holes.Secure with Proper Hardware
Use bolts and clamps made for solar panels. Tighten them, but do not overtighten.Choose the Right Materials
Check this table for the best ways to attach panels:Method/Material Description Treated Wood Strong and resists bugs, but may warp over time. Metal Lasts longer and handles bad weather. Helical Piles Twisted into the ground, less digging needed. Drilled Shaft Piles Filled with cement, good for heavy panels. Galvanized Steel Zinc coating stops rust, lasts longer. Zinc-Aluminum-Magnesium Steel Needs less maintenance, lasts a long time. Post Pounder Anchors poles deep for more stability. Local Building Codes Always check rules before you start.
Tip: Always follow local building codes for your Ground Mount.
Wiring and Grounding
Connect the wires using MC4 connectors. Make sure each connection is tight and dry.
Run wires neatly along the frame. Use clips to keep them in place.
Ground your system. Follow the National Electric Code (NEC 690). Use a copper wire to connect all metal parts to the earth.
Label all wires and parts for safety.
| Safety Guideline | Description |
|---|---|
| Grounding Requirements | Follow NEC 690 and use certified parts. |
| Emergency Disconnect | Make sure you can shut off the system quickly. |
| Labeling | Mark all wires and parts clearly. |
| Rapid Shutdown | Add a way to turn off power fast in emergencies. |
Final Inspection and Maintenance
Check all bolts, wires, and panels for tightness and damage.
Look for cracks or dirt on the panels.
Clean panels at least once a year. Clean more often if you live in a dusty or pollen-heavy area.
Schedule a professional check every few years.
| Task | Description |
|---|---|
| Panel Surface Assessment | Look for cracks, dirt, or color changes. |
| Electrical Connection Check | Make sure all wires are safe and tight. |
| Inverter Inspection | Check the display and listen for odd sounds. |
Note: Ground-mounted systems are easier to check and clean than rooftop systems.
Common Mistakes to Avoid
Skipping the grounding step.
Using the wrong bolts or clamps.
Not checking local rules before starting.
Letting wires hang loose.
Forgetting regular cleaning and checks.
Tip: Do your research, follow each step, and ask a pro if you feel unsure.
You can put in a solar ground mount system if you follow each step. First, gather your tools. Next, get your site ready. Then, make a strong foundation. After that, build the frame. Last, put your panels on the frame. Use the best materials so your system is safe and lasts longer. Good materials also help you save money over time. Pick a spot with lots of sunlight. This helps your panels make more energy and makes cleaning easier.
Strong parts help your system work for many years.
Picking a good spot means less shade and more power.
Doing it yourself saves money and lets you add more panels later.
Be careful, do not skip steps, and enjoy having your own solar panel ground mount system!
FAQ
1. How do you choose the best location for ground mount solar panels?
You want a spot with full sunlight and no shade. South-facing areas work best. Flat land makes installation easier.
Tip: Check your site at different times of day to see how the sun hits it.
2. What materials should you use for a strong solar ground mount system?
Pick weather-resistant parts like galvanized steel or aluminum.
Use a Solar Panel Mounting Aluminum Bracket System for extra durability.
Avoid untreated wood or weak metals.
3. Can you expand your solar panel ground mounting systems later?
Yes, you can add more panels if you use modular frames.
Modular designs let you grow your system as your energy needs change.
Check out ground mounting options for easy upgrades.
4. What mistakes should you avoid with ground mount solar?
Here’s a quick list:
Skipping grounding steps
Using wrong bolts
Not checking local codes
Letting wires hang loose
Learn more about ground mount solar to avoid these errors.
