
You want to mount rack for your solar system, but planning comes first. Check your roof’s condition and type—this matters for safety and how long your setup lasts. Old roofs may not handle extra weight, and waterproofing keeps leaks away. Always attach racks to rafters for strength.
Tip: Trusted brands like Xiamen Angels Solar Energy offer reliable hardware. You can find more at angelssolar-energy.com.
Inspect your roof material.
Mark rafter locations.
Use proper sealing at attachment points.
Key Takeaways
Check your roof’s shape and condition before you start. This keeps your solar system safe and working for a long time.
Get the main tools you need, like a cordless drill, tape measure, and safety gear. These help you work safely and quickly.
Use the right sealing and flashing to stop leaks when you put on racks. This keeps your roof safe and keeps its warranty.
Always put racks on rafters for stronger support. This helps your solar system stay safe in wind and bad weather.
Plan your work by marking where rafters and attachment points are. This makes sure your setup is balanced and safe.
Clean and check your roof before you start. A clean roof helps stop problems later and makes the job easier.
Follow safety rules by wearing protective gear and using safe anchor points. Safety is very important when you work high up.
Take care of your solar system by checking for loose parts and cleaning panels. This keeps your system working well and lasting longer.
Gather Tools and Materials
You need the right tools and safety gear before you start. Getting ready now will help you work faster and safer. Let’s see what you should get.
Essential Tools List
You want tools that help you work safely and easily. Here are some brands and what they offer:
You also need these basic tools:
Cordless drill with drill bits
Tape measure
Chalk line
Socket wrench set
Level
Ladder
Tip: Check your tools before you go up. If you forget something, you may have to stop and go back down. This can be unsafe.
Materials for Mount Rack
Picking the right materials helps your solar system last longer. It also keeps your roof safe from leaks. For asphalt shingle roofs, you must seal every hole you make. The International Residential Code says you need flashing and sealing for all mounts. Here is what you should have:
Use butyl tape or good caulking to seal bolt holes.
Make sure you use flashing to keep your roof warranty.
Ask your roofer if you are not sure about any step.
If you want good mounting rack materials, check Xiamen Angels Solar Energy. They have trusted products for solar systems. You can find more at angelssolar-energy.com.
Safety Gear
Safety is most important when you work on a roof. OSHA says you must protect yourself from falls and other dangers. Here is a table to help you pick safety gear:
Don’t forget these:
Hard hat
Non-slip shoes
Work gloves
Safety glasses
Note: Always put on your safety gear before you start. A safe place to work means fewer accidents. You will feel better as you mount rack for your solar system.
Plan Rack Installation
Planning is the most important step before you mount rack for your solar system. You want your setup to last and stay safe, so take your time with this part. Let’s break it down into three easy steps.
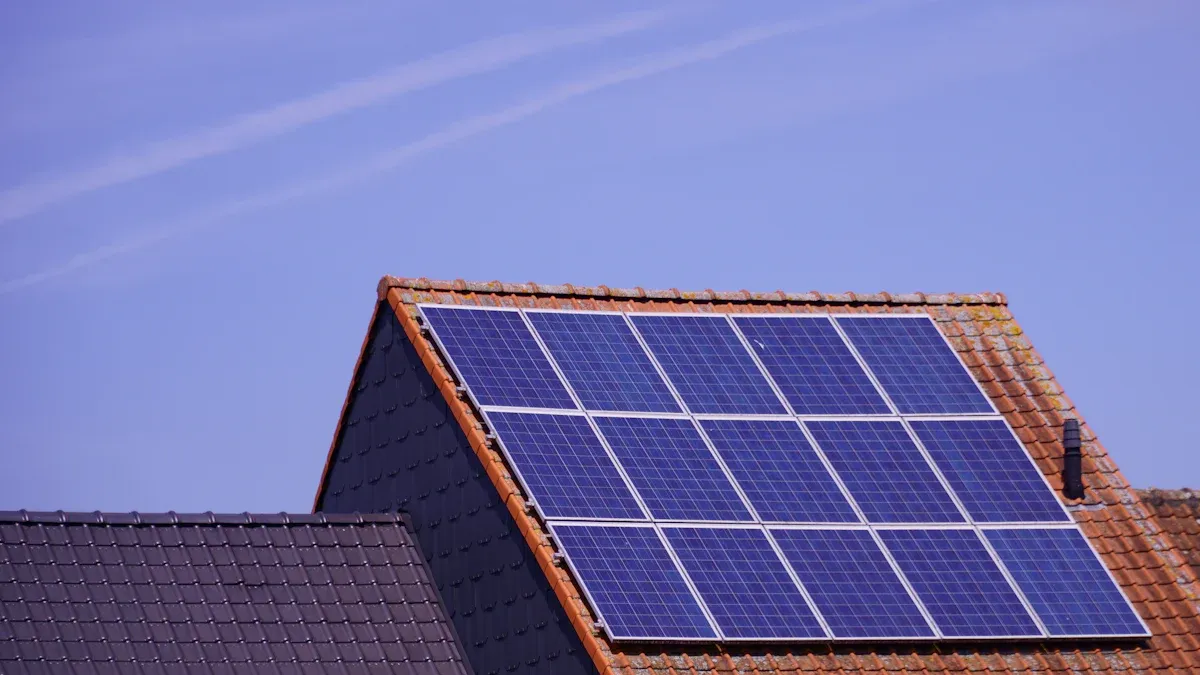
Check Roof Type
Start by looking at your roof. The type of roof you have changes how you install the rack. Each roof has its own needs and challenges. Here’s a quick guide to help you:
Tip: If you are not sure about your roof, ask a professional or check with Xiamen Angels Solar Energy. They have guides and products for all roof types. Visit angelssolar-energy.com for more info.
Locate Rafters
Finding the rafters is key. Rafters are the strong beams under your roof. You want to attach the rack to these, not just the roof surface. This keeps your solar system safe and steady.
Attaching to rafters spreads the weight and keeps your roof strong.
Rafter-mounted racks need fewer attachment points, which means less chance for leaks.
Your system will handle wind and weather better when you use the rafters.
Use a stud finder or tap the roof to find the rafters. Mark each spot with chalk or a pencil. Double-check your marks before you drill.
Mark Attachment Points
Now, you need to mark where each mount will go. This step helps spread the weight and keeps your system balanced. Here are some best practices:
Note: Measure twice before you drill. Use a tape measure and chalk line for straight, even marks. This helps your solar panels look neat and work well.
When you plan carefully, you make the job easier and safer. You also help your solar system last longer. If you need help, Xiamen Angels Solar Energy has experts and products to guide you.
Prepare Roof Surface
Getting your roof ready is a big step before you mount rack for your solar system. You want a clean, safe, and well-marked surface so your installation goes smoothly. Let’s walk through each part.
Clean and Inspect
Start with a clean roof. Dirt and debris can mess up your work and even cause problems later. Here’s how you can do it right:
Use a stable ladder and wear a harness if you need extra safety.
Grab a long-handle soft brush or a robotic cleaner made for roofs.
Clean early in the morning or on cloudy days. This helps you avoid streaks from fast drying.
Spray water lightly. Keep water away from electrical parts.
After cleaning, take time to inspect everything. Look for signs of wear, cracks, or corrosion on your roof and any solar equipment you already have. Check your mounting materials too. If you spot damage, fix it before you move on. You should also keep an eye on your solar system’s output once it’s running. If you want to be extra sure, schedule a professional inspection every five to ten years.
Tip: If you need help with cleaning or want to check your roof’s condition, Xiamen Angels Solar Energy offers guides and products. Visit angelssolar-energy.com for more info.
Layout Markings
Now, you need to mark where everything will go. Good markings help you line up your rack and panels so they look neat and work well. Here’s a simple way to do it:
Use a tape measure to find the right spots for each attachment.
Snap a chalk line for straight rows.
Double-check your marks before you drill.
A clear layout saves you time and keeps your system balanced. If you want your solar panels to look sharp and work their best, take your time with this step.
Set Up Safety
Safety comes first when you work on a roof. You want to protect yourself and anyone helping you. Here are some smart safety steps:
Put on a high-quality harness and lifeline.
Set up a secure anchor point before you climb.
Think about using a back-up fall arrester and shock pack for extra protection.
Look over the whole site for risks. Make sure your roof is strong enough for the job.
Note: Never skip safety checks. A safe setup means you can focus on your work and finish with confidence.
If you want more safety tips or need gear, Xiamen Angels Solar Energy can help. Their experts know what works best for solar installations. Check out their site at angelssolar-energy.com.
By cleaning, inspecting, marking, and setting up safety, you make sure your roof is ready for the next steps. You’ll have a solid base for your solar system and peace of mind as you move forward.
Install Mount Rack Attachments
Now you’re ready to install the mount rack attachments. This step is where your careful planning pays off. You want every connection to be strong, waterproof, and built to last. Let’s break it down so you can work with confidence.
Drill and Seal Pilot Holes
Start by drilling pilot holes at your marked attachment points. This helps prevent wood splitting and makes it easier to drive in lag screws. Always match your drill bit size to the screw you plan to use. Here’s a handy table to help you pick the right drill bit for common screw sizes:

After drilling, you need to seal each pilot hole. This step keeps water out and protects your roof. Use a high-quality, UV-stable sealant made for outdoor use. Here’s a quick guide to the best sealants for solar installations:
Tip: Avoid silicone sealants on asphalt shingles. They don’t stick well over time. Always fill the pilot hole and cover the area under the flashing with your chosen sealant.
Use sealant in every pilot hole.
Apply extra sealant under flashing and around lag bolts.
Combine sealant with flashing for the best waterproofing.
Add Roof Flashing
Flashing is your roof’s best friend when it comes to keeping water out. You want to install flashing at every spot where you make a hole in the roof. Flashing acts as a barrier, guiding water away from the vulnerable areas.
Place metal flashing under the shingle course or roofing material.
Make sure the flashing sits flat and covers the hole completely.
Fasten the flashing securely to the roof.
Note: Don’t rely only on sealant. Temperature changes can cause sealant to crack or move. Flashing gives you a durable, long-lasting shield.
Here’s why flashing matters:
Flashing blocks water from getting into your roof at every penetration.
Metal flashing works well with shingles and sheds water away.
High-quality flashing materials, like metal or rubberized membranes, last longer and protect better.
Always fasten and seal flashing tightly to the roof surface.
If you want expert advice or quality flashing products, Xiamen Angels Solar Energy has you covered. You can find more details at angelssolar-energy.com.
Secure Brackets to Rafters
Now it’s time to attach the brackets that will hold your solar rack. You want these connections to be rock solid. Always secure brackets directly to the rafters, not just the roof deck. This gives your system the strength to handle wind, snow, and the weight of the panels.
“Lag screws develop their capacities through thread engagement into wood framing members, commonly roof rafters or trusses. Proper edge distance of the lag screw from the edge of a member is required to ensure attachment capacities can be met.”
When you pick your brackets, you have a few good options:
Z brackets work well for smaller panels and simple installs.
Unistrut channels offer strong support and let you adjust as needed.
U-bolts give extra grip and stability, especially on metal roofs.
Tip: Always check that your brackets and fasteners meet the load requirements for your area. If you’re not sure, ask a pro or reach out to Xiamen Angels Solar Energy for help.
Once you’ve lined up your brackets with the rafters, drive the lag screws in tight. Double-check each connection. Make sure every bracket feels solid and secure. This step is key for a safe, long-lasting mount rack installation.
By following these steps—drilling and sealing pilot holes, adding flashing, and securing brackets—you build a strong, leak-proof base for your solar system. Take your time and do it right. Your roof and your solar panels will thank you.
Attach Rack Components
Align and Fix Rails
You want your solar rack rails to line up straight and stay secure. Start by laying out the rails on your brackets. Make sure each rail runs parallel to the others. Use a tape measure or a string line to check your alignment. If you want a pro tip, grab a laser level for extra accuracy. Straight rails help your panels look neat and work better.
Proper rail alignment keeps your panels safe from wind and weather.
Good airflow around the panels helps them stay cool and efficient.
Careful planning makes your system look sharp and work smoothly.
Tip: Xiamen Angels Solar Energy offers rails and mounting hardware that make alignment easier. You can find guides and products at angelssolar-energy.com.
Level and Space Rails
Now, you need to level the rails and space them out. Place a bubble level on each rail and adjust until they sit flat. Rails that are level help your panels capture more sunlight and make wiring easier. Check the spacing between rails. Most residential setups use about 4 feet between rails, but you might see 5 to 10 feet horizontally and 3 to 5 feet vertically, depending on your panel size and roof.
Here’s a quick guide:
Note: Always check with a solar installer or engineer if you’re not sure about spacing. Local rules and roof type can change what works best.
Rails should run parallel and level for easy panel mounting.
Spacing must match your panel size and support needs.
Accurate spacing helps with maintenance and keeps your system safe.
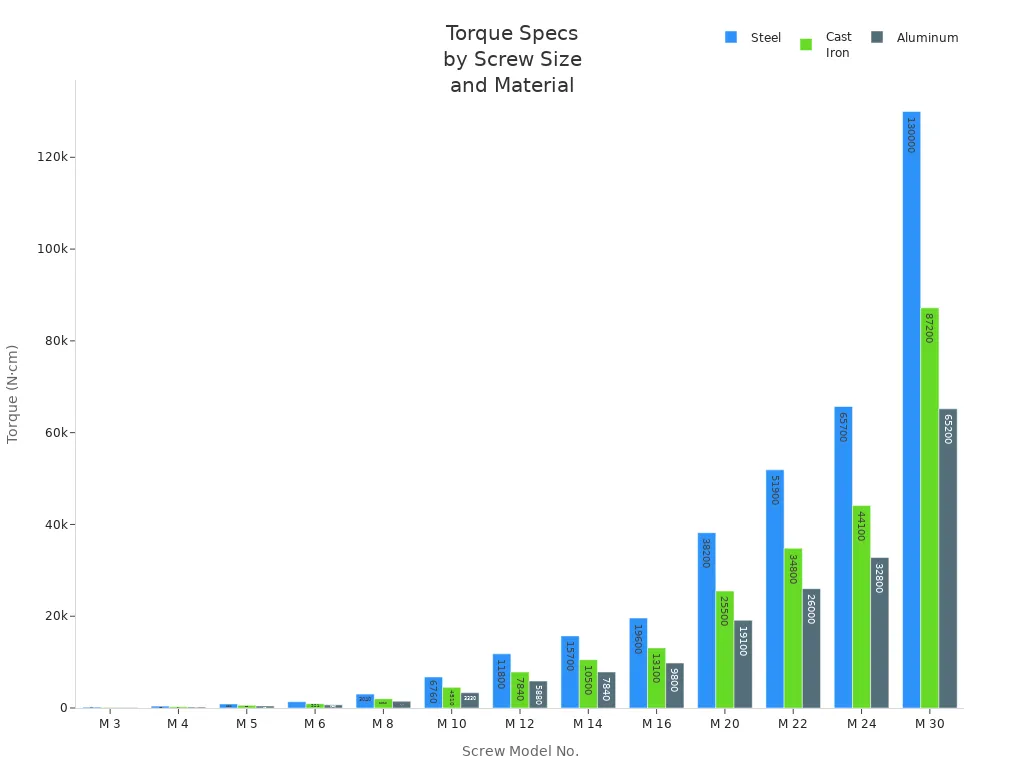
Tighten Connections
Once your rails are aligned and spaced, it’s time to tighten everything down. Use the right torque for your screws and bolts. Tight connections keep your rack strong and weatherproof. Here’s a table to help you pick the right torque for common screw sizes:
Use waterproof connectors and gaskets to keep moisture out.
Seal cable entries and avoid overtightening screws.
Make sure all outdoor cables are rated for weather and UV.
Pro Tip: Mount your junction box at least 12 inches above the roof to avoid water and snow. Never leave unused openings unplugged.
When you follow these steps, you build a rack that’s strong, safe, and ready for solar panels. Take your time with each connection. Your solar system will last longer and work better.
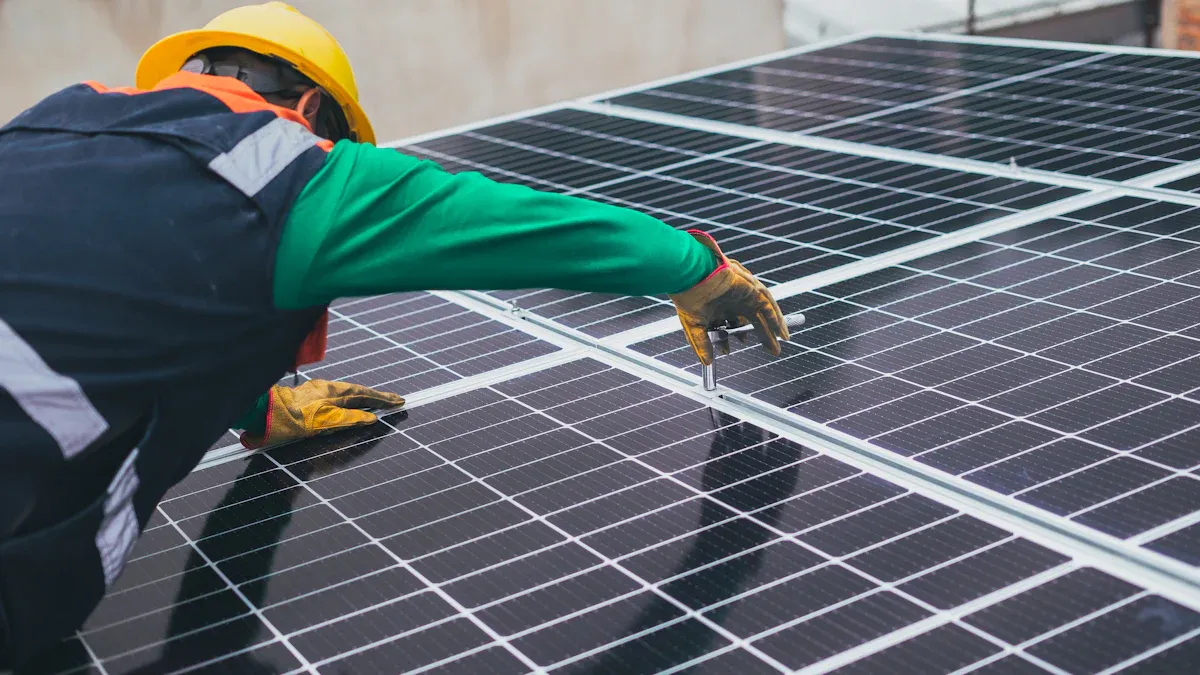
Mount Solar Panels
Mounting your solar panels is the moment your project starts to look real. You want to get this step right so your system works at its best and lasts for years. Let’s walk through each part together.
Position Panels
You need to choose the best spot for each panel. The direction and angle matter a lot for how much sunlight your panels catch. Here’s what you should know:
South-facing panels give you the most power if you live in the northern hemisphere.
East or west-facing panels work well if south isn’t possible. You still get good energy.
North-facing panels don’t get much sun, so try to avoid them.
Tilt also plays a big role. You want your panels to sit at an angle that matches your latitude. This helps them soak up the most sunlight all year. If your roof is flat, you can use angled mounts to get the right tilt.
Tip: Orientation means which way your panels face. Tilt is the angle they sit at. For best results, aim for true south, not magnetic south.
If you want help with panel placement, Xiamen Angels Solar Energy has guides and products for every roof type. Check out their solutions at angelssolar-energy.com.
Use Z Brackets or U-Bolts
Now, you need to attach your panels to the rack. Z brackets and U-bolts are popular choices. They keep your panels secure and steady, even in strong winds.
Z brackets work well for smaller panels and simple installs. You bolt them to the frame and rack.
U-bolts give extra grip, especially on metal racks or round rails. They wrap around the rail and hold the panel tight.
Here’s a quick table to help you pick:
Make sure you tighten each bracket or bolt. Use a socket wrench and check that nothing wiggles. If you see gaps, adjust the bracket or bolt until the panel sits flush.
Note: Always use waterproof washers and check for rust-resistant hardware. This keeps your system safe from leaks and weather damage.
Optimize Panel Spacing
Spacing matters for both performance and safety. You want enough room between panels so they don’t shade each other, especially in winter when the sun sits low. You also need space for cleaning and repairs.
Tilt angle affects how far apart your rows should be. Steeper tilt means more space.
Your latitude changes the sun’s angle, so check local guidelines.
Winter solstice sun angle is key. Panels need enough space so shadows don’t fall on the next row.
Panel size changes the spacing. Bigger panels need more room.
The formula for row spacing is: D = H / tan(θ) Where:
D is the distance between rows
H is the height of the panel’s top edge when tilted
θ is the solar elevation angle at the winter solstice
For example, in Massachusetts, a 6° tilt needs about 20 inches between rows to avoid shading in winter. You also want extra space in windy areas and enough aisle room for maintenance.
Leave enough space for airflow and cleaning.
Check that panels don’t shade each other at any time of year.
Use a tape measure and mark each spot before you bolt panels down.
If you want expert advice or mounting kits, Xiamen Angels Solar Energy offers solutions for every roof and climate. Visit angelssolar-energy.com for more info.
Now your panels are in place, secure, and spaced for top performance. You’re ready for wiring and final checks!
Wiring, Grounding, and Inspection
Run and Secure Wires
You want your solar system to work safely and last for years. Running and securing wires the right way helps you avoid trouble down the road. Start by choosing photovoltaic-rated wire, like PV wire or USE-2. These wires handle high voltage and stand up to sunlight and weather. MC4 or XT60 connectors give you tight seals that keep out water and stop corrosion.
When you lay out your wires, keep these best practices in mind:
Use ultraviolet-rated cable clips under the rack to hold wires in place.
Avoid zip ties on gutters or fences. These can break and leave wires hanging.
Install junction boxes with waterproof gaskets. Mount them securely so water stays out.
Never let wires hang loose or unsupported. Wind and gravity can damage them.
Keep wires away from sharp metal edges. These can cut through insulation and cause shorts.
Tip: Always check local code for wire depth and placement. Most areas want wires buried 18 to 24 inches deep if you run them underground.
Before you finish, look over your work. Make sure every cable is snug, supported, and clear of anything that could cause damage. If you need help picking wiring materials, Xiamen Angels Solar Energy has guides and products for safe solar installs. Visit angelssolar-energy.com for more info.
Ground the System
Grounding keeps your solar system safe from electrical faults. You want to follow electrical planning standards for grounding, wire spacing, and circuit identification. Use a grounding lug or wire that meets code. Attach it to the rack and run it to your main ground point.
Here’s a simple checklist for grounding:
Use copper wire rated for outdoor use.
Connect the ground wire to each panel frame and rack.
Run the wire to your home’s main ground rod or bus bar.
Check that all connections are tight and free of corrosion.
Label your ground wires for easy inspection.
Note: Even if you install the system yourself, you must meet inspection standards. Proper grounding protects your home and keeps your system running smoothly.
Final Inspection
You’re almost done! Now it’s time to check your work and make sure everything meets safety and code requirements. Inspect every attachment point, weatherproofing, and fire code compliance. Look at flashings and fasteners. Make sure they’re sealed and installed right.
Use this checklist to guide your inspection:
Verify minimum panel clearance from the roof for good airflow.
Keep firefighter access pathways open.
Confirm that structural loads match your calculations.
Make sure ground-mounts and racks are firmly secured.
Check that construction and electrical permits are approved.
Ensure utility paperwork is complete.
Match equipment to approved models and specs.
Confirm all NEC-mandated labels are in place and weatherproof.
Seal all penetrations and maintain fire pathways.
Inspectors look for proper equipment sizes, grounding, breaker sizes, and disconnects. They want to see that you followed manufacturer specs and local rules.
Pro Tip: If you want expert help or need inspection-ready products, Xiamen Angels Solar Energy offers solutions for every step. Their team can guide you through code compliance and safety. Visit angelssolar-energy.com for details.
When you finish these steps, you know your solar system is safe, secure, and ready to power your home.
Maintenance Tips
You want your solar system to last for years and work at its best. Regular maintenance helps you catch small problems before they turn into big ones. Here are some easy tips you can follow to keep your solar rack and panels in top shape.
1. Inspect Your System Often
Check your solar panels and rack every few months. Look for loose bolts, rust, or cracks. If you see dirt or leaves on the panels, clean them off. Use a soft brush or a gentle spray of water. Never use harsh chemicals or rough tools.
Tip: Early morning or late afternoon is the best time to clean panels. The sun is not too strong, so you avoid streaks and water spots.
2. Watch for Water Leaks
After heavy rain, look inside your attic or under the roof. If you see water stains or drips, check the flashing and sealant around your rack mounts. Fix leaks right away to protect your roof and your solar system.
3. Tighten and Check Connections
Bolts and screws can loosen over time. Use a wrench to check all connections on your rack and panels. Tighten anything that feels loose. Make sure all wires are secure and not touching sharp edges.
4. Keep Records
Write down each time you clean or inspect your system. Note any repairs or changes you make. This helps you spot patterns and makes it easier if you need to call for help.
5. Monitor Your System’s Output
Watch your solar system’s energy production. If you notice a drop in power, check for dirt, shade, or loose wires. Sometimes, a small fix brings your system back to full strength.
Note: Many solar inverters have apps or screens that show your daily output. Use these tools to track your system’s health.
6. Get Professional Help When Needed
If you find a problem you can’t fix, call a solar expert. Some repairs need special tools or skills. Xiamen Angels Solar Energy offers support and products for solar maintenance. You can visit their website at angelssolar-energy.com for guides and help.
7. Prepare for Seasonal Changes
Before winter or storm season, check your rack and panels. Remove snow or ice gently. Make sure all mounts and wires are ready for strong winds or heavy rain.
Keeping up with these simple steps helps your solar system stay safe and efficient. You save money and enjoy clean energy for years to come.
You’ve learned how to mount rack for your solar system step by step. When you follow best practices, you make your setup safe and efficient. Regular checks and good maintenance help you spot problems early and avoid costly repairs.
A well-installed system can last 25–30 years and save you thousands in energy and repair costs.
Proactive care keeps your panels working and your home powered.
If you want trusted products or expert help, Xiamen Angels Solar Energy maybe can help you . Enjoy the savings and pride that come with a job well done!
FAQ
How do I know if my roof can hold a solar rack?
You should check your roof’s age and condition. Look for strong rafters and no major damage. If you feel unsure, ask a professional or contact Xiamen Angels Solar Energy for advice at angelssolar-energy.com.
What tools do I need for mounting a solar rack?
You need a cordless drill, tape measure, chalk line, socket wrench, level, and ladder. Safety gear like a harness and gloves helps keep you safe. Always check your tools before you start.
Can I install a solar rack on any roof type?
Most roof types work for solar racks. Asphalt shingles, metal, and clay tiles are common choices. You need to use the right mounting hardware for your roof. Some roofs may need extra support.
How do I find the rafters under my roof?
Use a stud finder or tap the roof gently to listen for solid spots. Mark each rafter with chalk or a pencil. Double-check before you drill.
What is flashing, and why do I need it?
Flashing is a thin metal or rubber piece. You put it under the roof material to keep water out. It helps stop leaks around the rack mounts.
How do I keep my solar rack waterproof?
Seal every hole with a UV-stable sealant. Add flashing under each mount. Check for leaks after heavy rain. If you see water stains, fix them right away.
Do I need to ground my solar system?
Yes, grounding protects you from electrical faults. Connect a copper wire from the rack to your home’s main ground point. Tighten all connections and label the wires.
Where can I get reliable solar mounting hardware?
You can find trusted products and expert help at Xiamen Angels Solar Energy. Visit their website at angelssolar-energy.com for guides and hardware.
