
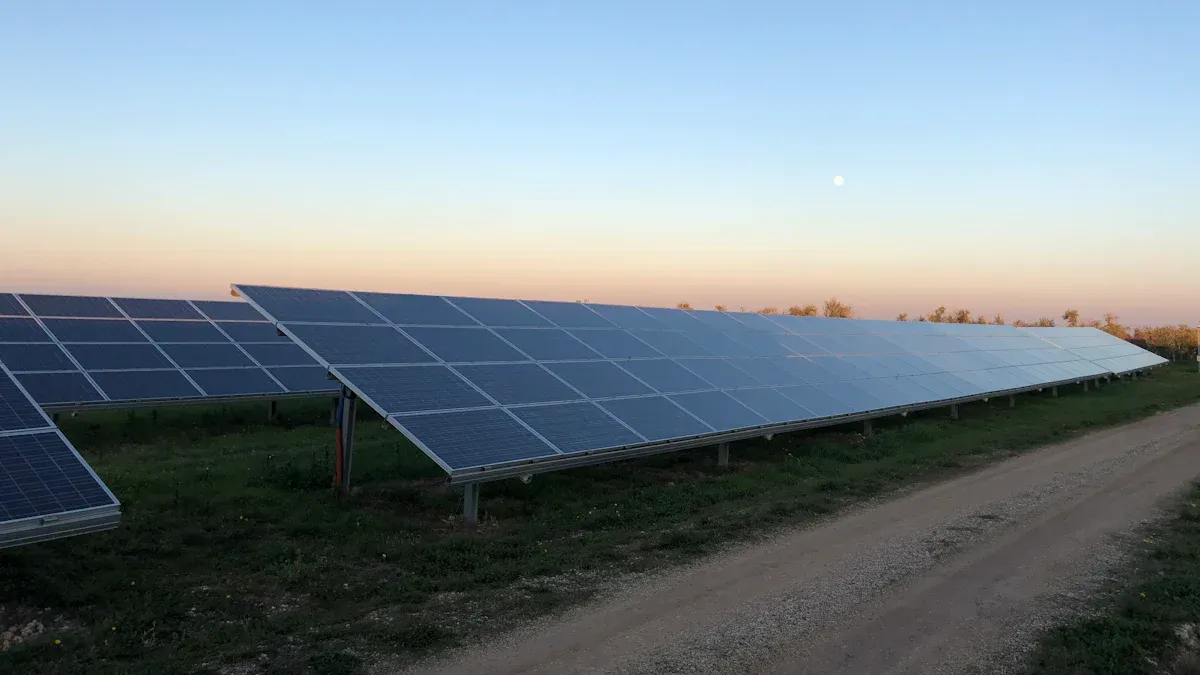
Solar Ground Mounts let you set up solar panels right on your property, not on your roof. You get to pick the best spot—maybe a sunny, open area away from shade. These systems fit many types of land. Many people choose them because you can adjust the tilt for more power, keep panels cooler, and clean them easily. Check out the chart below to see how popular ground mounts are in the U.S.:

You can get 20–25% more power compared to roof setups.
No need to worry about tricky roof shapes or climbing ladders.
Key Takeaways
Solar Ground Mounts let you put panels on the ground. This helps them get more sunlight and make more energy.
You can change the angle of ground-mounted panels. This can make them produce up to 30% more energy than fixed panels.
Ground mounts are easier to take care of. You can clean and fix them without going on the roof.
These systems can work for over 25 years if installed well and made with good materials. They help you save money for a long time.
Think about how much land you have. Ground mounts need open space. They work best for farms or big properties.
Fixed-tilt mounts cost less and need little care. Adjustable mounts make more energy.
Tracking systems move to follow the sun. They can make up to 40% more energy. But they need more space and cost more money.
Look at local rules and permits before you start. These can change how you set up your system and how much it costs.
1. What Are Solar Ground Mounts
Basic Structure
Definition
You might wonder what Solar Ground Mounts are. These are solar panel systems that you install right on the ground, not on your roof. You usually see them in open spaces like backyards, fields, or even large commercial lots. The panels sit on sturdy frames or poles anchored into the earth. This setup gives you a lot of freedom to pick the best spot for sunlight.Durability
You want your solar system to last, right? Solar Ground Mounts can keep working for 25 years or more if you use quality materials and install them well. Check out this chart to see how they compare to other mounting options: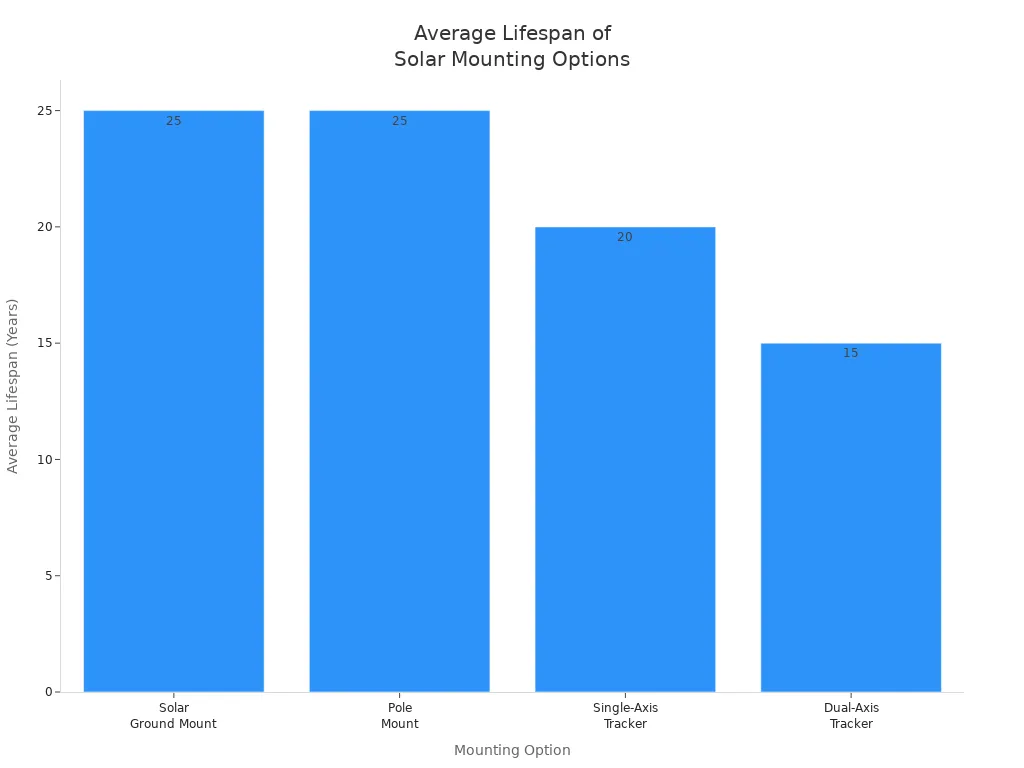
Optimal Orientation and Tilt
You can adjust the angle and direction of your panels with Solar Ground Mounts. This means you can point them straight at the sun and tilt them just right. If you live in the Northern Hemisphere, you can face your panels south and tilt them about 15 degrees from your latitude. This setup can boost your energy production by up to 30%. You also avoid shade from trees or buildings because you pick the best spot.
How They Work
You set up the system in a sunny area with enough space.
The panels collect sunlight and turn it into electricity, just like rooftop systems.
The frames or poles keep everything steady and safe, even in wind or rain.
You can use Solar Ground Mounts for homes, businesses, or off-grid cabins. They work well almost anywhere you have open land.
Tip: If your roof is too small, shaded, or oddly shaped, ground mounts give you a great alternative.
Key Components
Mounting Structures
Steel Poles or Posts – These anchor your system to the ground and give it height.
Base or Foundation – You might use concrete or ground screws to keep everything stable.
Beams and Rails – These hold your solar panels at the right angle.
Clamps and Connectors – These keep the panels and rails locked in place, even in bad weather.
Panels and Inverters
Solar Panels – These capture sunlight and create electricity.
Inverters – These change the electricity from DC (direct current) to AC (alternating current), which you use in your home or business.
Wiring and Safety
Wiring – This connects your panels to the inverter and your electrical system.
Safety Features – You need fuses, breakers, and sometimes surge protectors to keep everything safe.
Note: Each part of the system helps you get the most power and keeps your setup running smoothly for years.
2. Types of Solar Ground Mounts
When you look at Solar Ground Mounts, you’ll find several types. Each one has its own strengths. Let’s break them down so you can see which fits your needs best.
Standard Fixed-Tilt
Simple and Reliable
Fixed-tilt systems stay in one position all year. You set the angle during installation, and that’s it. These mounts use sturdy frames that anchor right into the ground. You don’t have to worry about moving parts or motors.Low Maintenance
You’ll love how little work these need. Fixed-tilt systems have fewer things that can break. That means less time and money spent on repairs.Cost-Effective
These are usually the most affordable option. If you want to keep your budget in check, fixed-tilt mounts make sense.Energy Output
Fixed-tilt systems produce steady power, but they don’t always catch the most sunlight. Studies show they can generate 15–20% less energy than adjustable systems. Still, they work well if you want a simple setup.
Tip: Fixed-tilt mounts are great if you want a “set it and forget it” system.
Adjustable Tilt Mounts
Boost Your Power
Adjustable tilt mounts let you change the angle of your panels. You can do this by hand a few times a year. This helps you catch more sunlight as the seasons change.Higher Efficiency
You can get 3% to 8% more electricity just by adjusting the tilt. In some places, you might see even bigger gains. If you want to squeeze out every bit of energy, adjustable mounts help you do that.Easy to Use
Most adjustable systems use simple levers or pins. You don’t need special tools. Just unlock, tilt, and lock again.Best for Changing Seasons
If you live where the sun’s angle changes a lot, adjustable mounts make a big difference. You can get up to 5.7% more solar energy in some regions.
Note: Adjustable tilt systems cost a bit more than fixed ones, but you get more power in return.
Pole-Mounted Systems
Space Savers
Pole-mounted systems use one or more sturdy poles to hold your panels above the ground. This design saves space. You can even park your car or store equipment underneath.Great for Uneven Land
Got a sloped yard or rocky ground? Pole mounts work well on uneven terrain. You don’t need a flat spot.Less Shading
These mounts sit higher up. That means less shade from trees or buildings. Your panels get more sun.Extra Uses
Farmers use pole mounts for shade over livestock or crops. Businesses use them for solar parking. You get more than just electricity.Optional Tracking
Some pole mounts can turn to follow the sun. This can boost your energy by up to 25% compared to fixed systems.
Tip: Pole-mounted systems work well in cities, farms, or anywhere you want to use your land for more than just solar.
Tracking Systems
Follow the Sun for More Power
Tracking systems let your solar panels move during the day. The panels follow the sun as it travels across the sky. This means your panels always face the best direction for sunlight.Types of Trackers
Single-Axis Trackers: These move your panels from east to west.
Dual-Axis Trackers: These move your panels up and down, as well as side to side.
Big Energy Gains
You can get a lot more electricity with tracking systems. Here’s what you might see:Single-axis trackers can boost your energy by 10% to 30%.
Dual-axis trackers can give you up to 40% more power than fixed systems.
Most people see a 20% to 30% increase in energy compared to non-tracking setups.
Best for Large or Open Spaces
Tracking systems work best if you have lots of room. Farms, big backyards, and solar farms use them the most.Extra Features
Some trackers use sensors to find the sun. Others use timers or software. You don’t have to adjust them by hand.
Tip: If you want to get the most energy from your panels and you have enough space, tracking systems are a smart choice.
Scalable and Universal Mounts
Grow Your System Anytime
Scalable mounts let you start small and add more panels later. You don’t have to buy everything at once. This is great if you want to expand your solar setup over time.Fits Any Panel
Universal mounting systems work with many panel sizes and brands. You don’t have to worry about matching parts. These systems use adjustable rails and clamps.Strong and Long-Lasting
Most scalable and universal mounts use corrosion-resistant materials. They last for years, even in tough weather.Easy for Big Projects
Large solar farms and commercial buildings use these mounts. The Industrial-XL system, for example, helps you install lots of panels quickly. It keeps everything safe and meets all the rules.Flexible for Any Site
You can use scalable and universal mounts on homes, businesses, or huge fields. They work on flat or sloped land.
Note: If you want a system that grows with you or fits any panel, scalable and universal mounts make things simple.
Modular designs let you change your setup as your needs change.
These mounts give you secure attachment points and help you get the best angle for sunlight.
You can use them for Solar Ground Mounts, rooftops, or even mixed installations.
3. Pros and Cons
When you think about Solar Ground Mounts, you want to know the good and the bad. Let’s break it down so you can decide if this system fits your needs.
Benefits
Optimal Sun Exposure
You get to pick the best spot for your panels. No roof? No problem. You can place your system in a sunny area with no shade.
You can tilt and turn your panels to face the sun all year. This means you get more energy and save more money.
Easy Maintenance
You can reach your panels without climbing a ladder. Cleaning and repairs become simple jobs.
You don’t have to worry about roof leaks or damage. Your roof stays safe and untouched.
Flexibility and Scalability
You can start small and add more panels later. Your system grows with your needs.
You can use almost any type of solar panel. Universal mounts make upgrades easy.
Here’s a quick look at the main benefits:
Tip: You get more control over your solar setup with ground mounts. You can adjust, expand, and maintain your system with less hassle.
Drawbacks
Land Use
You need open space for your system. If you live in a city or have a small yard, this can be tough.
Some people worry about how solar panels look in their yard. Large arrays can change the view.
Upfront Cost
You pay more at the start. Ground systems need strong frames and land prep, which adds to the price.
Here’s what you might spend:
The price can go from $85 for a small DIY kit to $2,389 or more for a large, pro system.
Permitting
You may need special permits. Rules can change based on where you live.
The process can take longer than a rooftop system because of land checks and inspections.
Here are some common drawbacks:
You need a lot of land, which can be a problem in crowded areas.
The setup costs more than roof systems.
You need to keep the panels clean and clear of debris.
The look of big solar arrays may not please everyone.
Permits and inspections can slow things down.
Note: Think about your space, budget, and local rules before you choose a ground mount system.
4. Ground Mounts vs. Roof Mounts

Performance
When you compare ground solar mounting to roof mounts, you’ll notice some big differences in how much energy you can get. With ground solar mounting, you can place your panels in the sunniest spot and set the perfect angle. This means you get more power from every panel. Roof mounts, on the other hand, depend on your roof’s direction and slope. If your roof faces the wrong way or has lots of shade, you lose out on energy.
Here’s a quick look at how each system performs:
You can adjust ground solar mounting systems for the best sunlight all year.
Roof mounts often can’t move, so you get less energy if your roof isn’t ideal.
Tip: If you want the most power possible, ground solar mounting gives you the edge.
Installation
You’ll find the installation process is very different for each system. Roof mounts need you to check your roof’s age, shape, and strength. You might need repairs before you even start. Installers have to work around vents, chimneys, and skylights. This can slow things down.
Ground solar mounting skips all that. You pick a sunny spot in your yard or field. You do need to clear the land and dig trenches for wires. This takes more work at the start, but you don’t have to worry about your roof at all.
Here’s what you can expect:
Roof Mounts:
Check roof condition and structure
Work around obstacles like vents
May need roof repairs first
Ground Solar Mounting:
Prepare the site and clear space
Dig trenches for wiring
No roof worries
You get more freedom with ground solar mounting, but it takes more effort to set up.
Cost
Let’s talk money. Roof mounts usually cost less to install. The roof is already there, so you don’t need to build a new structure. Labor is easier, and you finish faster. Ground solar mounting costs more upfront because you need strong frames, concrete, and extra digging.
Check out this table for a quick comparison:
Ground solar mounting can save you money in the long run because you can clean and fix your panels easily.
Roof mounts might need pros for repairs, which adds to the cost over time.
If you want easy access and plan to keep your system for years, ground solar mounting can pay off.
Suitability
When you pick a solar system, you want to know if it fits your property. Not every home or business works well with every type of solar mount. Let’s look at which setups match different spaces.
1. Homeowners With Limited Land
If you live in a city or have a small yard, roof-mounted systems usually make more sense. You use the space you already have—your roof. You don’t need to clear land or worry about losing your garden. Roof mounts work best when your roof faces south and gets lots of sun.
You save space in your yard.
You pay less for installation.
You avoid big changes to your property.
But roof mounts have some limits. If your roof has lots of vents, skylights, or a strange shape, you might not fit many panels. You also have to think about roof repairs. If you need a new roof, you must remove the panels first.
2. Properties With Plenty of Open Land
Do you have a big backyard, a farm, or a business with extra space? Ground solar mounting gives you more options. You can build a larger system and put it in the sunniest spot. You can even use land that doesn’t work for much else—like a rocky field or a patch that’s hard to mow.
You get easy access for cleaning and repairs.
You can add more panels later if you need more power.
You can set the perfect angle for the sun.
Ground solar mounting works well for homes, schools, farms, and businesses with lots of land. You can even use it for off-grid cabins or remote sites.
3. Table: Which System Fits Your Property?
Here’s a quick guide to help you decide:
Tip: If you want to build a big solar system or your roof isn’t right for panels, ground solar mounting gives you more freedom.
4. Special Cases
Farms and ranches often choose ground solar mounting. They can power barns, pumps, or even electric fences.
Schools and businesses with open fields can build large solar arrays.
Off-grid cabins use ground mounts because they may not have a strong roof.
5. What Should You Consider?
How much open space do you have?
Does your roof get enough sun?
Do you want to expand your system later?
Do you care about how your yard looks?
If you have lots of land and want the most power, ground solar mounting is a smart choice. If you want to save space and money, roof mounts might work better. Think about your property and your goals before you decide.
5. Installation, Cost, and Maintenance
Site Assessment
Space and Sunlight
You want your solar panels to soak up as much sun as possible. Start by looking for a wide, open area on your property. Make sure there are no tall trees or buildings that cast shadows during the day. The more sunlight your panels get, the more energy you’ll produce. Walk around your yard at different times to check for shade. If you have a big, sunny spot, you’re off to a great start.
Soil and Terrain
Next, check your ground. Is it flat, sloped, rocky, or sandy? Flat land makes installation easier, but you can still use ground solar mounting on slopes or uneven spots. Soil type matters too. Hard, rocky ground may need special tools or foundations. Wet or sandy soil might require deeper anchors. A quick soil test helps you pick the right mounting system and foundation.
Installation Steps
Planning and Permits
You need a plan before you start building. Here’s what you should do:
Site Assessment – Figure out the best spot for your panels.
Design Planning – Decide how many panels you want and how they’ll line up.
Permits and Approvals – Check with your city or county. Most places need building permits for ground solar mounting. You may also need electrical permits and zoning checks. Some areas have rules about how close panels can be to property lines or how tall they can stand. If you live in a neighborhood with a Homeowners Association (HOA), ask about their rules too.
Tip: Always include detailed plans and equipment lists with your permit application. After you finish, an inspector will check your system for safety.
Site Prep
Now it’s time to get your hands dirty. Clear away grass, rocks, or debris from your chosen spot. Mark where each panel will go. If you’re working with a contractor, they’ll handle this step. If you’re a DIY fan, you can buy wholesale kits from suppliers like Xiamen Angels Solar Energy Co., Ltd. They offer strong, reliable mounting systems for both homeowners and contractors.
Mounting and Wiring
Once the site is ready, you’ll install the foundation. This could be concrete piers, ground screws, or driven posts, depending on your soil. Next, build the racking system that holds your panels. Attach the solar panels to the racks, making sure they face the right direction and tilt at the best angle. Connect the wiring from the panels to the inverter and then to your home’s electrical system. If you’re connecting to the grid, your utility company may need to inspect the work.
Commissioning
The last step is commissioning. This means testing your system to make sure everything works. Turn on the system and check the inverter display. Watch for any error messages. Your installer or inspector will run a few tests to confirm your panels are making power safely. Once you pass inspection, you can start using your solar energy.
Cost and Incentives
Upfront Costs
Ground solar mounting usually costs more than roof systems. For residential projects, expect to pay about 10–15% more than a roof install. Commercial systems can range from $150,000 to $500,000, depending on size. The average cost for businesses is $1.83 to $3.50 per watt before incentives. After rebates and tax credits, the price drops to $1.20 to $1.75 per watt.
Incentives and Rebates
You can save a lot with incentives. The federal government offers a 30% tax credit for solar installations. Many states add their own programs. For example, Arizona gives a 25% state tax credit (up to $1,000), plus sales and property tax exemptions. New York offers a 25% state tax credit (up to $5,000), cash rebates, and tax exemptions. New Jersey and Virginia have similar programs. Check with your state and utility for the latest deals.
Long-Term Savings
Solar Ground Mounts help you save money for years. Most homeowners break even in 5–8 years. After that, you keep saving—often $20,000 to $50,000 over the life of your system. Solar panels can also boost your property value by 4–6%. If your payback period is less than half your system’s lifespan, you’re making a smart investment.
Note: The right setup and incentives can turn your ground solar mounting project into a long-term win for your wallet and the planet.
Maintenance and Lifespan
Routine Care
You want your ground solar mounting system to last for years. Good news—keeping it in top shape is pretty simple. Here’s what you should do on a regular basis:
Clean the panels: Dust, pollen, and bird droppings can block sunlight. Use a soft brush or hose to wash your panels every few months. If you live in a dusty area, you might need to clean them more often.
Manage vegetation: Grass and weeds can grow tall and cast shadows. Trim plants around your panels so nothing blocks the sun.
Check the structure: Walk around your ground solar mounting system and look for loose bolts, rust, or bent parts. Tighten anything that seems wobbly.
Inspect the wiring: Look for cracked wires or loose connections. If you see anything odd, call a pro to fix it.
Watch for animals: Squirrels and birds sometimes nest near solar panels. Make sure no critters are chewing wires or building homes under your system.
Monitor performance: Most inverters have a display or app. Check your energy output every month. If you see a big drop, something might need attention.
Schedule professional inspections: Once a year, have a solar expert check your system. They can spot problems you might miss.
Tip: Set a reminder on your phone for these tasks. Regular care keeps your ground solar mounting system running strong.
System Longevity
You want your investment to last. Most ground solar mounting systems work for 25 to 30 years or more. The panels themselves often come with a 25-year warranty. The mounting frames, made from steel or aluminum, can last even longer if you keep them clean and rust-free.
Here’s what helps your system last:
Quality materials: Choose corrosion-resistant frames and sturdy hardware.
Proper installation: Make sure your ground solar mounting system sits on a solid foundation. Good installation prevents shifting and damage.
Routine checks: Catching small issues early stops big problems later.
Upgrades: Inverters usually last 10 to 15 years. Plan to replace them once during your system’s life.
You can expect your ground solar mounting system to keep saving you money for decades. With a little care, you’ll enjoy clean energy and lower bills for a long time. 🌞
You get a lot of perks with ground solar mounting. Here’s a quick list to help you remember:
Higher energy production from perfect panel placement
Easy access for cleaning and repairs
Cooler panels that last longer
Room to expand your system
But you should also think about these points:
Take a walk around your property. Check your sunlight and space. If you’re not sure, talk to a solar pro or get a site check. Ground solar mounting can power your home and help the planet. 🌞
FAQ
1. Can I install ground solar mounting systems myself?
Yes, you can install ground solar mounting systems if you like DIY projects. Many companies sell kits with instructions. You should check local rules and consider hiring a pro for electrical work.
2. How much space do I need for ground solar mounting?
You need about 100 square feet for every kilowatt of solar panels. A typical home system uses 300–500 square feet. Open, sunny land works best.
3. Will ground solar mounting work on sloped or uneven land?
Yes! Ground solar mounting systems can handle slopes and uneven ground. You may need special posts or adjustable frames. A site check helps you pick the right setup.
4. Do ground solar mounting systems need a lot of maintenance?
No, you only need basic care. Clean the panels, trim plants, and check for loose parts. Most people spend just a few hours each year on maintenance.
5. Is ground solar mounting more expensive than roof mounting?
Usually, yes. Ground solar mounting costs more at first because you need extra frames and land prep. You save money over time with easy cleaning and repairs.
6. Can ground solar mounting increase my property value?
Yes, ground solar mounting often boosts your property value. Buyers like homes with lower energy bills and clean energy systems.
7. What happens if it snows on my ground solar mounting system?
Snow slides off panels more easily when you tilt them. You can brush off heavy snow with a broom. Panels keep working once the snow melts.
Tip: Ground solar mounting gives you easy access for cleaning after storms or snow.
